Showing posts with label Tim Holtz 3-D Texture Fades. Show all posts

Friday, May 5, 2023

Celebrate ....

Hi everyone.


Dropping in today as it is the 5th of the month and that means it is the start of the new challenge month over at Bizzy Becs.

My card that I am sharing was created to celebrate our son's 30th birthday and I love how it came together.  The new Tim Holtz colorize die Celebrate was a perfect addition to my stash together with the Alphanumeric Emporium dies and just had to use them to create this card.

First I chose different colours of blue and cream cardstock for the cake and after sorting my dies, cake parts together, balloons together etc, I put them onto magnetic sheets and put them back into the folder I then die cut all the parts needed for the cake.

I embossed my blue cardstock next with the Numbered texture fade from Tim Holtz as it was a perfect addition to this card and put it all together after inking edges with walnut stain.

I then cut out 3 of each of the sentiment using the new alphanumeric emporium dies from Tim Holtz from a shiny brown cardstock and glued them together


                                                                                                             Supplies used:

Tim Holtz Colorize Thinlits Die - Celebrate
Tim Holtz Thinlits Die - Alphanumeric Emporium
Tim Holtz Texture Fades 3d embossing - Numbered
Tim Holtz Distress Mini Ink Pads - Kit 3 Walnut Stain

Thanks for looking

Until next time

Happy Crafting


Friday, January 13, 2023

Brushstroke Flowers #2....

Hi again, dropping in today to share another creation with you.

  For my card , I have used some Distress Oxide Ink Pads, Tim Holtz 3D embossing folder and Tim Holtz Sizzix dies  and have to say I am quite happy with the result.

Firstly,  I die cut the flowers & leaves from watercolour paper then put various colours of ink pad onto my craft sheet and spritzed them with water.  I then smooshed the flowers around in the ink until I was happy with look.  Oxide always drys a little lighter so I made sure it was a heavy application.   The process was then repeated with the leaves.  When they were dry I inked around the outside of the die cuts with Walnut Stain Distress Ink pad and then used my Foundry Wax for some gold highlights.

The embossed background was wiped over lightly with Kitsch Flamingo to create a pop of colour and then die cut to fit nicely on my card base.


Supplies used:

Sizzix Thinlits Tim Holtz - Brush Stroke Flowers #2

Tim Holtz 3d Texture Fades - Doily

Sizzix Thinlits Tim Holtz - Stitched Rectangles

Sizzix Thinlits Tim Holtz - Celebrations Word Script

Tim Holtz  Distress Oxides 

Ripe Persimmon,Rusty Hinge,Mustard Seed,Fossilized Amber,Wild Honey,Carved Pumpkin

Kitsch Flamingo, Old Paper,Crushed Olive,Peeled Paint

Tim Holtz Distress Ink Pad - Walnut Stain

(similar results can be achieved using Distress Ink Pads)

Ranger Distress Foundry Wax - Gilded

Paper Roses -  Black & White Sentiment Sheets

Minc Foil reactive cardstock

Go Press Foil - Gold Iridescent Triangle Pattern

Minc Machine


Thanks for looking

Until Next Time - Happy Crafting


Sunday, June 5, 2022

Brushstoke Flowers # 3....

 Hi everyone, dropping in today to share my latest inspiration.

Wow can you believe it, we are in June already and the start of winter, not that we have had much rain yet, but it has been so cold.  I think we about  had  3°C overnight, brrr.   

It is also the start of a new challenge month over at Bizzy Becs and for my card I have used some product by Tim Holtz and sizzix and was inspired by a card I saw by Juliana Michaels of 17turtles.com .

For my background I first embossed my cardstock using my 3d Texture Fade - Typewriter, then smooshed the background with some Distress Oxide in  Bundled Sage.  When completely dry I brushed over the raised areas of the card and edges with Distress Ink in Walnut Stain.  


My flowers were cut three times in three different colours for each flower and after I chose the combination I wished to use, I inked around each piece with Walnut Stain and glued them together. To create some dimension I glued a second layer under the main flower and slightly off set it.  For the centre of the flowers I covered them with Dimensional Magic and sprinkled  them with 13 @rts Gold XS microspheres.  


Supplies used:

Sizzix  by Tim Holtz Thinlits Die - Brushstroke Flowers # 3
Sizzix by Tim Holtz 3D texture fade - Typewriter
Tim Holtz Distress Mini Ink Cubes - Set # 3 Walnut Stain
Tim Holtz Distress Oxide - Bundled Sage
Stampers Anonymous by Tim Holtz - Simple Sayings CMS155
13 @rts - Gold XS Microspheres


Thanks for looking

Until next time, Happy Crafting


Wednesday, January 5, 2022

Festive Bouquet - Happy New Year...

Hi everyone.


Dropping in today to share with you my latest creation using a new Tim Holtz die and some Mica Sprays, it is also the start of our new challenge month over at Bizzy Becs Challenge Blog.

I just love how everything came together so easily.  All the flower and leaf pieces have been cut from Watercolour Paper and then sprayed with Mica Sprays a couple of times to increase intensity of the colours.  Once dry I then used Distress Ink in Walnut Stain around the outside of some of the pieces.

When everything was totally dry,  I gave the flowers and leaves some shape to create exta dimension.

The circle frame and sentiment have been cut from silver foil cardstock and love how it makes everything pop.


Supplies used:

Sizzix Thinlits by  Tim Holtz - Festive Bouquet
Sizzix 3d Intertwine embossing folder by Tim Holtz - Basket Weave 
Coloured with Tim Holtz Distress Mica Stains
from Christmas and Halloween Limited Release in
Peppermint Stick, Winterberry, Flickering Candle, Holly Branch, Tree Lot & Frosted Juniper
Distress Ink Pad  Kit 3  - Walnut Stain
Creative Expressions Die by Sue Wilson - Starry Happy New Year
Paper Roses Die - Stitched Rectangles
Paper Roses Die - Circle Frames Stitched


Thanks so much for looking and if you would like you can join us for this months challenge.

Until next time - Happy Crafting


Friday, December 10, 2021

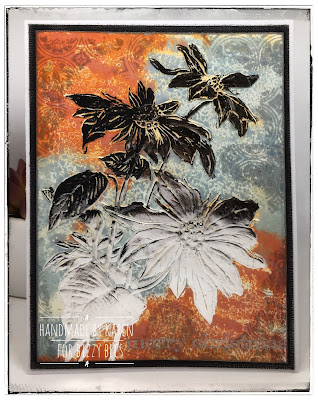
Pointsettia Christmas.....

                                                                             Hi everyone.


I  have had this Pointsettia 3D die in my stash for some time and I have finally got an opportunity to use it.    I have taken inspiration with the foil for my card from Google, but have used Silver instead of Gold to highlight the Pointsettia.. 

Before embossing I inked the inside of one side on the embossing folder with Distress Oxide in Crackling Campfire and Speckled Egg, spritzed it with water, then run my cardstock through my BigShot.  When dry I stamped around the edge of the cardstock using an older Stampers Anonymous Stamp called Fragments  (from my stash)  and Archival Stamp Pad in Hickory Smoke and also inked around the outside edge.  I then  painted the Pointsettia with Tim Holtz Resist Spray and ran it though my Mink Machine to set the Silver Foil.

Before mounting to my card base I run some Finnabair Alchemy Wax in Brushed Iron  around the black cardstock to co-ordinate with the foil.

Although it does show up very well, I have also stamped and embossed in silver at the bottom of the card. 


Supplies used:

Tim Holtz 3D Texture Fades Embossing Folder - Pointsettia 

(not in stock but can be ordered if available)

Tim Holtz Distress Oxide - Crackling Campfire & Speckled Egg

Finnabair Alchemy Waxes - Brushed Iron

Tim Holtz - Distress Resist Spray


Thanks for looking - until next time


Happy Crafting


Friday, February 5, 2021

Birthday Greetings....

 Hi everyone, dropping in today to share my latest card which was created for the start of the new challenge month over at Bizzy Becs.

I have had this Botanical 3-D texture fade folder for a while so thought it was time to dust it off and have a play.  Before putting it through my Big Shot,  I lightly spritzed both sides of my Teal cardstock with water to help with the embossing.   After embossing I lightly applied Antique Bronze Distress Crayon to the raised areas and rubbed it in with my finger.  Once I was happy with the look I applied Tim Holtz Distess Glaze over the entire background and buffed it once dry.  To finish the card I added Tarnished Brass Distress Crayon randomly across the card front.

The framed script die was cut twice from Cryogen then glued together to create dimension.  Love how the cardstock has a slight sparkle to it.


using:

Taylored Expression Dies - Framed Script - Happy

Taylored Expressions Stamp (Sentiment)  - Flip the Floral

Taylored Expressions Die - Simple Strips 

Tim Holtz 3-D Texture Fades - Botanical 662716

Tim Holtz Distress Crayons - Tarnished Brass & Antique Bronze

Cardstock - Cryogen 250 gsm


Thanks so much for dropping by and looking

Until next - keep safe and happy crafting