Showing posts with label Tim Holtz Distress Oxide Ink Pads. Show all posts

Friday, November 15, 2024

Surfin' Santa.....

 Popping in today to share with you my inspiration for this months challenge over at The Crafters Cafe Blog Challenge, which starts today.

This month our theme is Anything Goes with the option of Monochromatic and the challenge runs for the month of November and December

 our sponsors for challenge #314 are

  and 


I have chosen an image from Dr Digi's called Surfin' Santa and have coloured him in Copic Markers using Warm Greys.  Once coloured I used my cloud stencil and Distress Oxide in Pumice Stone to compliment the Warm Grey colouring. The image was then backed onto a piece of warm grey Bazzil cardstock and I used a light warm grey to cut out the sentiment.  


Supplies used:

Dr Digi's House of Stamps - Surfin'  Santa 
Paper Roses Die - 16575 Stitched Rectangles
Tim Holtz Sizzix Die - 660058 Holiday Words Script
Copic Markers - W1,3,5,7,9
Distress Oxide Ink Pad - Pumice Stone


Thanks so much for looking 

We love seeing all your creations, so please join us and look forward to seeing you again when the challenge returns in January 2025.

Until next time - Happy Crafting


Sunday, September 15, 2024

Little Mouse....

Hi everyone.


Dropping in today as it the start of our new challenge over at The Crafters Cafe Challenge Blog.

This month our sponsor is

Beccys Place


and our theme is

 #312 Anything Goes with an option to add an Animal


For my card I have chosen this cute little digi which is a freebie on Beccys Place and have coloured him up with Copic Markers.


supplies used:

Beccys Place Digital Stamp - Little Mouse

All and Create Die - Splodazzlers

Creative Expressions Die - Mini Expressions - Happy Birthday

Distress Oxide ink pad - Tumbled Glass

Cloud Edger Stencil - A Colorful Design

Copic Markers


Pop on over to the challenge blog and check out my team mates designs this month and while you're there, add your own creation and play along.

Thanks for looking

Until next time Happy Crafting


Sunday, April 16, 2023

Best Wishes...

Hi everyone

I am popping in today to share my latest card created using some Darkroom Door Stamps and a Stencil that I have had in my stash for a while.

 For my card I firstly taped my Bristol Board card base to my stencil and then taped this to my glass mat.  I applied Kitsch Flamingo and Spiced Marmalade Distress Oxide through the stencil and then using my Blossom stamp, inked it with Morning Mist Versa Clair,  stamped through the stencil before removing it from my mat.

I then stamped my Robin onto some Bristol Board and cut out using a stitched circle die and applied to the front of my card with foam tape to create some dimension, then applied my sentitment to finish.  I love the colours and final finish.


supplies used:

Darkroom Door Stamp - Robin DDES017

Darkroom Door Stamp - Bold Blossoms DDRS081

Darkroom Door stamp - Simple Sayings DDRS119

Darkroom Door Small Stencil - Arty Circles DDSS016

Tim Holtz Distress Oxide - Kitsch Flamingo & Spiced Marmalade

Lawn Fawn Die - Small Stitched Rectangles

Paper Roses Die - Stitched Circles

Versa Clair Stamp Pad - Morning Mist & Nocturne


Thanks for looking

Until next time - Happy Crafting


Monday, March 13, 2023

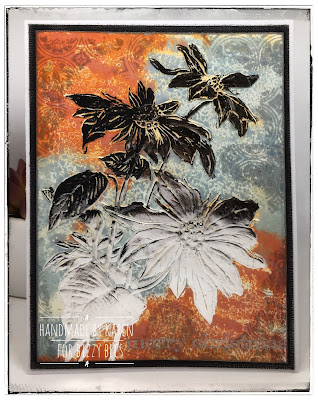
Carved Leaves....

 Today I am dropping in to share some inspiration and have chosen to use Distress oxides and a stencil from Darkroom Door to create my background for my masculine card. 

Firstly I applied in patches Dried Marigold, Wild Honey, Rustic Wilderness & Salvaged Patina, then smooshed Walnut Stain and Salvaged Patina.  When my background was completely dry I sponged Clear Versamark through the stencil and applied Clear Embossing Powder.  After embossing I then inked the entire background with Archival Black Soot and then wiped over the embossed areas to remove the ink.  To seal my background I then applied Distress Glaze.

The birthday words were applied with clear embossing powder then reinked and lightly sprinkled with a gold embossing powder.

Lots of inky fun, I was inspired by a Simon Hurley video recently viewed, Josephs Coat colouring technique and you can find the link to youtube here.


Supplies used:

Lawn Fawn Die - Large Stitched Rectangles

Paper Rose Die - Stitched Rectangles

Darkroom Door Stencil -  Carved Leaves DDSS0026

Darkroom Door Stamp - Happy Birthday DDSE001 

Distress Oxides 

Wild Honey, Dried Marigold, Rustic Wilderness, Savaged Patina & Walnut Stain

Tim Holtz Distress Glaze

Clear & Ancient Gold Embossing Powder


Thanks so much for looking

Until next time - Happy Crafting


Friday, January 13, 2023

Brushstroke Flowers #2....

Hi again, dropping in today to share another creation with you.

  For my card , I have used some Distress Oxide Ink Pads, Tim Holtz 3D embossing folder and Tim Holtz Sizzix dies  and have to say I am quite happy with the result.

Firstly,  I die cut the flowers & leaves from watercolour paper then put various colours of ink pad onto my craft sheet and spritzed them with water.  I then smooshed the flowers around in the ink until I was happy with look.  Oxide always drys a little lighter so I made sure it was a heavy application.   The process was then repeated with the leaves.  When they were dry I inked around the outside of the die cuts with Walnut Stain Distress Ink pad and then used my Foundry Wax for some gold highlights.

The embossed background was wiped over lightly with Kitsch Flamingo to create a pop of colour and then die cut to fit nicely on my card base.


Supplies used:

Sizzix Thinlits Tim Holtz - Brush Stroke Flowers #2

Tim Holtz 3d Texture Fades - Doily

Sizzix Thinlits Tim Holtz - Stitched Rectangles

Sizzix Thinlits Tim Holtz - Celebrations Word Script

Tim Holtz  Distress Oxides 

Ripe Persimmon,Rusty Hinge,Mustard Seed,Fossilized Amber,Wild Honey,Carved Pumpkin

Kitsch Flamingo, Old Paper,Crushed Olive,Peeled Paint

Tim Holtz Distress Ink Pad - Walnut Stain

(similar results can be achieved using Distress Ink Pads)

Ranger Distress Foundry Wax - Gilded

Paper Roses -  Black & White Sentiment Sheets

Minc Foil reactive cardstock

Go Press Foil - Gold Iridescent Triangle Pattern

Minc Machine


Thanks for looking

Until Next Time - Happy Crafting


Sunday, November 13, 2022

Seas the Day....


Hi everyone, dropping in today to share some inspiration with you.  

  I a few days ago, I was bitten on the palm of my hand by a bee when folding up the washing, so have found using my hand very sore and as it was swollen,  it made it very hard to bend my fingers .  Now the swelling has subsided I can get back to crafting - yay.

For my card I am using a stamp set from Altenew called Seas the Day.  As the card was  being done as a birthday card I found that the sailing boat was going to be perfect for  what I had in mind.

I coloured the stamped image with Polychromos Pencils and you will find the colours used are listed below.  My background was coloured using Distress Oxides and for the sky I used my cloud stencil.


Supplies used:

Altenew Outline Stamp Set - Seas the Day

Altenew Stamp & Die Set - Happy Sentitments

Lawn Fawn Die - Small Stitched Rectangle Stackables

Polychromos Pencils

Sails: Magenta, Cold Grey VI, Mid Cadmium Red, Alizarin Crimson

Sail Boat: Burnt Umber, Burnt Sienna, Bistre, Brown Ochre

Distress Oxide Ink Pads - Stormy Sky & Uncharted Mariner

(a similar result could be achieved using Distress Ink Pads)


Thanks for looking.


Until next time - Happy Crafting


Monday, October 31, 2022

Happy Halloween....

Hi everyone.

Today is October 31st and in Australia many people will celebrate all things Halloween.

I have created a card using one of the older digitals from Bizzy Becs store and mixed it with some stencils from my own stash, some clear embossing powder, coloured texture paste and distress oxides.  I have coloured my image with prisma coloured pencils. 

To create my background I first sponged through my stencil with the Ranger Embossing Dauber to create a border of spider webs.  I embossed each one individually with clear embossing powder, before moving on to the Distress Oxides. Starting with Uncharted Mariner, then Tumbled Glass and finally Twisted Citron.  I then edged my card with the Black Soot Distress Ink Pad.  I then inked through my bat stencil with the Black Soot to add a few bats .  Finally I gently buffed the surface to expose the embossed areas.

Lastly I used liquitex Light Modelling Paste mixed with a little black gesso to create my spiders, which were on the Spider Web Stencil from my stash.

I had so much fun creating this background.


Supplies used:

Bizzy Becs Digital Stamp - Goth Angel Goth

Tim Holtz Distress Ink Set #3 - Black Soot

Distress Oxides - Uncharted Mariner, Tumbled Glass and Twisted Citron

Tim Holtz Stamp (sentitment) - Mr Bones

Dusty Attic Stencils - Bats & Web

Liquitex Light Modelling Paste

Black Gesso

Prisma Coloured Pencils - 150 Set

Skin and Hair - French Grey 10%,20%,50%,70% and 90%

Dress & Wings Cold Grey 50%,Blush Pink PC 928, Magenta PC930 & Pomegranite PC195


Thanks so much for looking

Until next time Happy Crafting


Friday, August 5, 2022

Waffled Diamonds...

Hi everyone, I am popping in today to share my latest  masculine card.

Today I have used a Altenew 3d Embossing Folder to create my card. 

 Before embossing I blended together three colours of Distress Oxide Ink.  Instead of inking bottom to top I inked from the sides to make it a little different.

First I used Mowed Lawn, then added Pine Needles and lastly Mermaid Lagoon, when I was happy with the blend I ran the inked background through the embossing folder. 

Before adhering the sentiment to create a distressed look I ran my sanding block over the top of the inked background until I was happy with the result.

Using the Happy Birthday Die I then multi cut it from white cardstock 3 times and then  once from Gloss Black cardstock and glued all the layers together.

I love how it turned out.


Supplies used:

Altenew 3d Embossing Folder - Waffled Diamonds
Tim Holtz Distress Oxides Mowed Lawn, Pine Needles & Mermaid Lagoon
Creative Expressions Die - Happy Birthday
Tim Holtz  Ideology - Sanding Grip Block Tool

Thanks so much for looking

Until next time - Happy Crafting


Tuesday, June 14, 2022

Peonies Trio Digi ....

Hello again.

Dropping in today to share my new inspiration using a soon to be released in store Digital Stamp from Bizzy Becs called Peonies Trio.

It is a very pretty stamp and was lovely to colour using my Prisma Coloured Pencils, which was mounted onto watercolour cardstock that was lightly coloured using Distress Oxide in Saltwater Taffy.


Supplies used:


Bizzy Becs Digital Stamp (newsletter freebie) -  Peonies Trio

(available in store soon)

Bizzy Becs Digital Stamp - Blog Freebie - Oval Sentiments

Lawn Fawn Die - Small Stitched Rectangle Stackables

Prisma Coloured Pencils - 150

Peonies - 926, 928, 1011,118,1002 & 938

Leaves - 1005,912,911

Tim Holtz Distress Oxide - Saltwater Taffy


Thanks for looking today

Until next time - Happy Crafting


Friday, December 10, 2021

Pointsettia Christmas.....

                                                                             Hi everyone.


I  have had this Pointsettia 3D die in my stash for some time and I have finally got an opportunity to use it.    I have taken inspiration with the foil for my card from Google, but have used Silver instead of Gold to highlight the Pointsettia.. 

Before embossing I inked the inside of one side on the embossing folder with Distress Oxide in Crackling Campfire and Speckled Egg, spritzed it with water, then run my cardstock through my BigShot.  When dry I stamped around the edge of the cardstock using an older Stampers Anonymous Stamp called Fragments  (from my stash)  and Archival Stamp Pad in Hickory Smoke and also inked around the outside edge.  I then  painted the Pointsettia with Tim Holtz Resist Spray and ran it though my Mink Machine to set the Silver Foil.

Before mounting to my card base I run some Finnabair Alchemy Wax in Brushed Iron  around the black cardstock to co-ordinate with the foil.

Although it does show up very well, I have also stamped and embossed in silver at the bottom of the card. 


Supplies used:

Tim Holtz 3D Texture Fades Embossing Folder - Pointsettia 

(not in stock but can be ordered if available)

Tim Holtz Distress Oxide - Crackling Campfire & Speckled Egg

Finnabair Alchemy Waxes - Brushed Iron

Tim Holtz - Distress Resist Spray


Thanks for looking - until next time


Happy Crafting


Thursday, March 11, 2021

Teacups....

 Hi everyone.


Dropping in  today to share my new card.   I have been having a play with emboss resist.  This is another old technique but have seen a few cards lately using the technique, so thought I would give it a go.

Firstly I used Distress Oxides in pinks from darkest to lightest,  then when dry brushed over the entire card with my embossing buddy.  I  used a background stamp with Versamark and clear embossing powder over the top of the Distress Oxides.  When dry I buffed up the embossing lines to make it a more shiny.

My teacups were also first stamped in Memento Black and then re stamped with clear embossing powder to match the background.  The teacups were then coloured with copic markers.  Unfortunately the pink background behind my teacups has photograph quite peachy but is pink in real life.


 Supplies used:

Darkroom Door Stamp - Teacups DDPS046 

Darkroom Door Background Stamp - Scratches DDBS012

Avery Elle die - Wonky Stitches

(very similary to the new MFT Die - Wonky Stitched Rectangles)

Penny Black Die - Hello

Distress Oxides - Kitsch Flamingo, Worn Lipstick & Spun Sugar

Copic Markers


Thanks for looking.

We hope that you can join us at Bizzy Becs for this months Anything Goes Challenge - we love seeing your creations.


Until next time - Happy Crafting


Thursday, November 5, 2020

Tiny Townie with an Elephant...

Hi everyone.


Just popping in today to share my new card made with a very cute little stamp from Stamping Bella.  I am very happy with how she turned out and the inked background was a great success.

After blending the oxides for my background I added small droplets of water, then damped off with a paper towel.  I then followed this by using splatters of white and black ink to the background.


Supplies used:

Stamping Bella Stamp - Tiny Townie with an Elephant (by request)
Penny Black Transparent Stamp - (Senitment used) Balloon Ride
Lawn Fawn Die - Stitched Rectangle Frames
Creative Expressions Die - Mini Expressions Happy  (by request)
MFT Die - Paris Skyline
Picket Fence Studio - Blending Brushes
Tim Holtz Distress Oxides - Seedless Preserves, Spun Sugar & Picked Raspberry
Copic Markers

Thanks for looking

Until Next time - Happy Crafting


Tuesday, October 13, 2020

Happy Birthday - Trees...

 Hi everyone.


Popping in today to share with you a new card using a couple of the wonderful Darkroom Door products 


I created an inky background on some Ranger Watercolour Paper using some Tim Holtz Distress Oxide Inks in Spiced Marmalade, Gathered Twigs and Black Soot.  My image was stamped in Versafine Clair ink - Nocturne . This was then backed with Charcoal Bazzil cardstock to compliment.


Supplies used:

Darkroom Door Stamps DDRS018 - Trees 

Darkroom Door Stamps DDSE001 - Happy Birthday

Thanks for looking


I am also entering my card into this months challenge for darkroom door mood board challenge for October in the Darkroom Door Inspiration facebookgroup

#darkroomdooroctoberchallenge


Until next time - Happy Crafting


Saturday, September 5, 2020

Happy Fathers Day

Hi everyone.


Popping in today to share with you my card for this months new challenge starting today over at Bizzy Becs Store Blog

For my card I have had a play with a new cloud stencil recently acquired called Cloud Edger and it is from acolorfullifedesign.com, and am very happy with how it turned out.  To create the sky I used a mixture of two Distress Oxides Broken China and Stormy Sky and teamed it with a Digital Image from Bizzy Becs Store called Cody Fishing.  This was coloured with Copic Markers and Polychromos Coloured Pencils.


Supplies used:

Bizzy Becs Digital Images - Cody Fishing
Creative Expressions - Mini Expressions Happy Birthday
Picket Fence -  Blender Brushes 10 pack
Tim Holtz Distress Oxide - Broken China & Stormy Sky
Cloud Stencil
Sakura Jelly Roll - White
Copic Markers
Polychromos Colour Pencils


Thanks for dropping in and having a look.

Until next time - Happy Crafting

Karen x
🌷

Sunday, July 5, 2020

Carved Birds.....


Hi everyone, dropping in today to share my card for this months new challenge over at Bizzy Becs Store Blog that starts today.


I have revisited some of my Darkroom Door Stamps for todays card and am very happy with how it has turned out.   After watching one of Tim Holtz's videos on distress backgrounds  I learned a new trick to doing  smoosh techniques - dry between applications, oh my what a difference.   Love how you get the little spots of colour -  so cool and lots of inky fun to create.


Supplies Used:

Darkroom Door Stamp - DDRS117 Carved Birds Vol 1
Darkroom Door Stamp - DDSE001 Happy Birthday
Darkroom Door Stamp - DDTS005 French Script
Lawn Fawn Die - Large Stitched Rectangle Stackable
Avery Elle Die - Wonky Stitches
Distress Oxide Ink Pads - Rusty Hinge, Faded Jeans, Hickory Smoke & Antique Linen
Embossing Powder White & Clear
Tim Holtz Distress Micro Glaze

I am also entering into this months colour challenge over at Darkroom Door Inspiration Facebook Group
#darkroomdoorjulychallenge


Thanks for dropping by

Until next time - Happy Crafting


Karen
🌷

Tuesday, May 5, 2020

Stitched Flowers.....

Hi everyone, dropping by today to share with you my latest card for the May Challenge starting today over at Bizzy Becs.

For this card I had a play with some Post It tape and created a mask for my flowers so that I could then use Distress Oxides to colour my cardstock.  I choose Tattered Rose as my background colour.  After removing the mask I then coloured up the stamped images with Copic Markers and high lighted the flower centres with my Signo Pen in Gold and White.  I have to say I am more than pleased with the result.


supplies used:
Penny Black Transparent Stamp - Stitched Flowers  (by request)
Sue Wilson Die Creative Expressions - Happy Birthday  (by request)
Memento Ink - Tuxedo
Tim Holtz Distress Oxide Stamp Pad - Tattered Rose
Picket Fence Studio Blender Brushes 
Copic Markers, Gold and White Signo Pen


Thanks for looking

Until next time - Happy Crafting


Karen
🌺

Sunday, April 5, 2020

Fabulous you.....

Hi everyone, just dropping in today to share my card for the start of this months challenge over at Bizzy Becs.

What a strange, unpredictable time we are all sharing.  I do hope that you and your family are all keeping well and for the crafters out there, able to get a small amount of time to play on your crafty projects.

I have started re organising my craft space albeit very carefully as unfortunately last week I cut my finger on a mandolin and have to be gentle with it until it fully heals.

I chose my elements for my card for ease of use due to my finger and have coloured up the die cut using Distress Oxides.


Supplies used:

Sizzix Thinlits Tim Holtz - Wildflower Stems # 1
Sue Wilson Mini Expressions die - Fabulous
Pink Fresh Studio (Stamped Sentiment) - Just a Little Lovely
Tim Holtz Distress Oxides - Worn Lipstick,Tattered Rose, Crushed Olive, Mowed Lawn, 
Fossilized Amer & Ground Espresso

Thank you for taking the time to visit

Virtual hugs - take care

Until next time - Happy Crafting


Karen 
🌼

Monday, February 10, 2020

Balloon Ride....

Hi everyone.

Just popping in today to share my latest card.


For the background I used Distress Oxides by applying the colours to a stamping block and spritzing them with water and then sploshed them onto my Bristol Board background, first with Broken China and then using Mermaid Lagoon.  Using my water brush I then flicked the Mermaid Lagoon onto the background.  I followed this by flicking some Interior Antique Gold - Brush n Leaf.

The lovely teddy image from Penny Black was coloured with Copic Markers.


Supplies used:
Penny Black Transparent Stamp - Balloon Ride
Avery Elle Die - Wonky Stitches
                                              -  Broken China
Copic Markers
Brush n Leaf Interior - Antique Gold
Hero Arts Embossing Powder - White

Thanks for looking
Until Next time - Happy Crafting


Karen
🌺